Can You Test for Continuity Through a Coil
Dan Ferrell writes about DIY car maintenance and repair. He has certifications in Automation and Control Technology and Technical Writing.
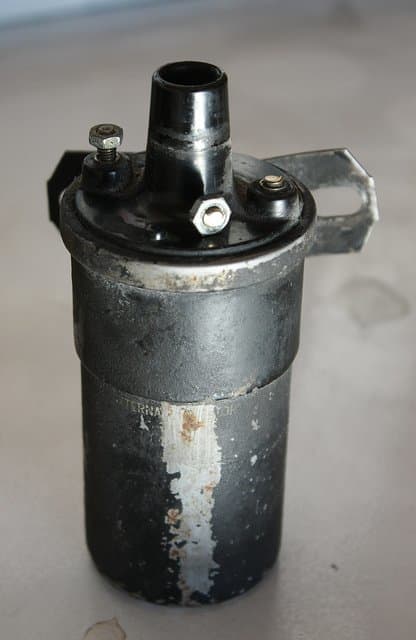
A conventional ignition coil with a broken primary terminal.
Photo courtesy of Nick Ares on Flickr.
Possible Symptoms of a Bad or Weak Ignition Coil
- Misfires
- Rough idle
- Power loss
- Engine stalling after reaching operating temperature
- No-start condition
What Does an Ignition Coil Do?
A typical ignition coil is a pulse-type transformer with a soft iron core and two coil windings on top of each other, known as primary and secondary. Using battery voltage, the coil supplies the spark plugs with a low-current, high-voltage electric arc of between 4000 and 60,000 volts or more, depending on the vehicle model, system resistance, and current engine operating conditions. The spark plugs use this electric arc to burn the air-fuel mixture inside the combustion chamber.
An ignition coil doesn't have any moving parts, so it usually has a long-lasting service life of thousands of trouble-free miles. Yet, the coil operates in a harsh environment that can affect its operation. High temperature, vibrations, dirty or corroded electrical terminals, and poor ignition system maintenance can all shorten the life of an ignition coil.
Testing Your Own Ignition Coil
Before you start replacing ignition coils (or some other ignition system parts) you need to confirm whether your ignition coil is good or bad.
The simple troubleshooting procedures described here use a digital multimeter to check the ignition coil. So you can apply these tests at home.
In This Article
- Tools and Items You'll Need
- Locating Your Ignition Coil
- Know Your Specs
- I. Testing the Coil's Primary Resistance
- II. Testing the Coil's Secondary Resistance
- III. Testing an Ignition Coil for Voltage Leaks and Other internal Faults
- IV. Testing an Open in a Coil
- Quiz
- Digital multimeter (this one will do the job)
- The resistance specifications for your coil windings
- Wrench or ratchet and socket set
- Hairdryer or heat gun, if necessary
- Test spark plug and test light, if necessary
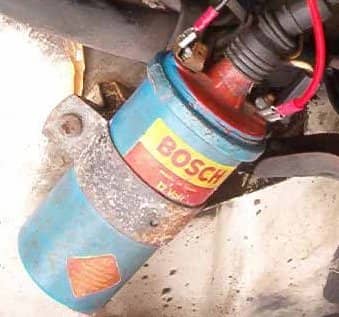
You may find the ignition coil mounted on the fender well.
Photo courtesy of Sonett72 on Wikimedia
Locating Your Ignition Coil
On vehicle models with a distributor, you will find a single ignition coil, either a cylindrical or rectangular assembly, usually mounted on the fender (driver side) of the engine compartment, away from direct engine heat. This single coil supplies each cylinder with a high-voltage spark. To locate it, follow the high-tension center wire on the distributor cap to the other end where it connects to the coil. Some distributors have the ignition coil mounted on top.
Vehicle models with a "waste spark" ignition type system will have one ignition coil for every two cylinders. And distributorless ignition systems (DIS) and coil-on-plug (COP) systems come with an ignition coil for every cylinder.
Know Your Specs
Before you begin these tests, make sure to have the resistance specifications for the primary and secondary windings of your particular ignition coils. You'll find this information in the service manual for your vehicle make and model. You'll need these resistance specifications to compare them to your own test results.
Next, you'll do a series of simple tests. Ignition coils come with two separate windings. They differ in wire size and number of turns, so each has a different electrical resistance value. You'll need the electrical value specifications for your application. The specifications can be found in the repair manual. If you don't have the manual, you can buy a copy from most auto parts stores or online.
Haynes Vehicle Repair Manuals
Author's own graphic.
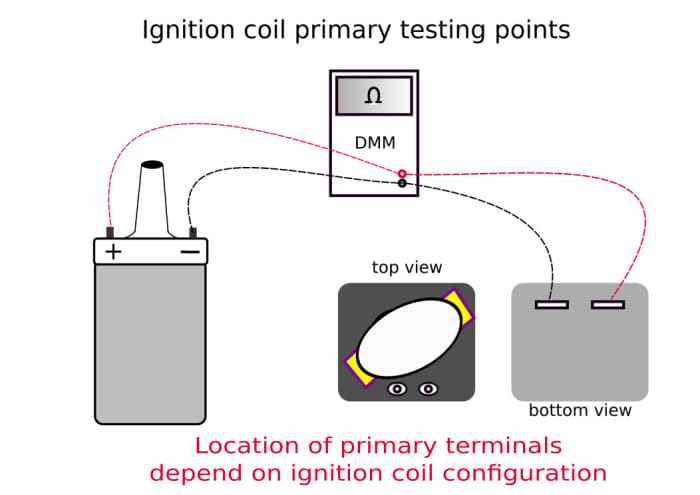
I. Testing the Coil's Primary Resistance
You may test the ignition coil while still mounted on the vehicle if you have good access to it; otherwise, remove it.
Scroll to Continue
Read More from AxleAddict
Distributor Ignition Systems:
- Unplug the electrical connector and the high voltage wire that connects the coil to the distributor.
- Unscrew the mounting bolts to remove the ignition coil from the vehicle.
- Visually inspect the wires and electrical connectors for corrosion, dirt and physical damage.
- Then, check the coil itself for potential physical damage. Any of these conditions will prevent your coil from producing the necessary voltage for the spark plugs.
- Set your digital voltmeter (DMM) to a low setting (about 10 ohms or less) on the Ohms scale or to auto-range mode.
- Connect your meter leads across the primary coil terminals. Touch one lead to the positive terminal (marked '+' or BAT), and the other lead to the negative (marked '-' or TACH).
Waste Spark Ignition Systems:
This type of system has an assembly with an ignition control module that supports and connects to the ignition coils. For most applications, you'll need to remove the coil assembly to gain access to the ignition coils. Once you remove the assembly, remove each ignition coil you want to test from the module.
- Then, check the coil itself for potential physical damage. Damage can prevent an ignition coil from producing the necessary voltage for the spark plugs.
- Set your digital voltmeter (DMM) to a low setting (about 10 ohms or less) on the Ohms scale or to auto-range mode.
- Connect your meter leads to the primary terminals at the bottom of the ignition coil.
Coil-On-Plug (COP) Systems:
Testing a coil-on-plug (COP) type ignition coil is similar to testing other ignition coils. To locate the primary and secondary terminals, consult your vehicle repair manual, if necessary. Watch the next video for a testing example.
Results:
Compare your readings to the specifications in your repair manual.
- A common primary resistance may range between 0.3 to 1.0 ohms.
- If resistance is below the acceptable specification, most likely the primary winding is shorted and the coil needs to be replaced.
- If resistance exceeds the specification, replace the ignition coil.
- If your meter indicates infinite resistance, the primary winding has an electrical open and the coil needs to be replaced.
Author's own graphic
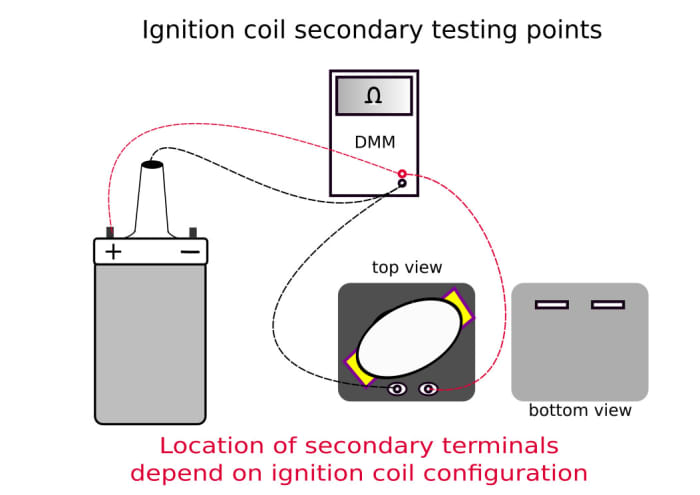
II. Testing the Coil's Secondary Resistance
Distributor Ignition Systems:
- Set your DMM to a 20K-ohms range or to auto-range mode.
- Connect one of the DMM leads to the positive (+ or BAT) terminal and the other lead to the coil's secondary terminal (coil tower).
NOTE: On some ignition coils, the coil's frame connects to the secondary. In this case, connect your ohmmeter leads across the secondary coil terminal and the coil's frame or the wire that connects to the frame (ground).
Waste Spark Ignition Systems:
- Connect your meter leads across the two secondary terminals located to one side of the coil body.
Coil On Plug (COP) Systems:
Consult your vehicle repair manual to locate the secondary terminals.
Results:
Compare your readings to the specifications in your repair manual.
- A common secondary resistance may range between 6,000 to 12,000 Ohms.
- If your reading is below specification, most likely the secondary winding is shorted. Replace the ignition coil.
- If your reading indicates infinite resistance, there's an electrical open in the winding. Replace the ignition coil.
- If your reading is higher than the specification, there's too much resistance in the winding. Replace the ignition coil.
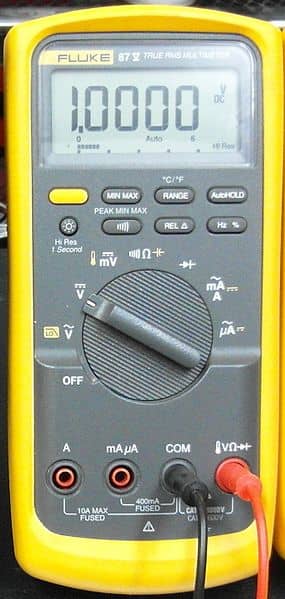
Use a digital multimeter to test the ignition coils' resistance.
Photo courtesy of Binarysequence on Wikipedia
III. Testing an Ignition Coil for Voltage Leaks and Other Internal Faults
Sometimes, ignition coil windings may test fine but other faults, like weakened or bad insulation around the windings or some other internal problems, can interfere with ignition coil operation. The next tests can help you find other potential faults.
For these tests, you'll need a test spark plug: either low voltage (~25 kV) or high voltage (~35 kV), depending on your application). And, if necessary, a test light.
- Connect the test spark plug to the output terminal of the ignition coil and ground the test spark plug.
- On systems with more than one coil, remove the fuel system fuse to prevent the engine from starting.
- Crank the engine, just enough to inspect the condition of the spark.
The test spark plug should fire a bright blue, snapping spark. If you see an orange spark (weak) or no spark at all, continue with the next test.
- Connect a test light between the negative terminal of the ignition coil and the ground. You may use a strand of copper wire, to use with the test light, that connects to the negative terminal and sticks out from under the connector, so that you have the connector plugged into the ignition coil during the test.
- Turn the ignition key to the On position.
- The test light should light on most applications; on others, it will not. Check the diagram for your car's ignition system in your repair manual, if necessary.
- If your car is in the first group above, if the test light doesn't light, the primary winding has an open, or there's an open between the ignition switch and the BAT terminal in the ignition coil.
- With the test light still connected, crank the engine.
- If the test light flashes, the primary circuit in the ignition system is working properly, but the coil is bad.
- If the test light doesn't flash, make sure there's battery voltage at the BAT terminal. If not, check the ignition switch or that side of the circuit or, in some applications, the crankshaft position sensor. If there's voltage, check the pickup coil unit or the ignition control module.
IV. Hints for Testing an Open in a Coil
Although you can easily test the coil using a digital multimeter, remember that a coil winding can also come apart (electrical open). The coil will work fine until it warms up, expanding the coil and stopping the electrical flow. So your tool may not detect the fault unless you heat up the coil with a heat gun or hairdryer, prior to testing it. However, you need to be careful not to overheat the coil; otherwise, you may actually break the winding or cause some other fault.
Keep this guide handy and use it whenever you suspect trouble with the ignition system in your car.
This article is accurate and true to the best of the author's knowledge. Content is for informational or entertainment purposes only and does not substitute for personal counsel or professional advice in business, financial, legal, or technical matters.
© 2016 Dan Ferrell
Source: https://axleaddict.com/auto-repair/How-to-Test-an-Ignition-Coil
0 Response to "Can You Test for Continuity Through a Coil"
Post a Comment